Archive | organization tips RSS feed for this section

Friday Find: Back-to-School Labels by Emily Press & Discount

Labeling items such as supplies, jackets and backpacks is another important step in organizing for back-to-school and increases the odds of items returning home at day’s end. Traditional sticky labels are easy to make at home, but don’t always hold up over time and aren’t always the right size. Emily Press Labels to the rescue! First seen on Project Nursery, these hip labels are today’s Friday Find.

Emily Press Labels are great because they are highly functional and durable, yet style-savvy. Available in a variety of sizes and types, the super stick-on labels are customizable with trendy color palettes, playful characters and fashionable designs.


Keeping cost in mind, I was instantly drawn to the value of the School Label Packets. There a few options to choose from, but the First Class School Label Pack is a winner and only available until Sept 30, 2010. It includes It includes 93 personalized including shoe labels, tag-a-tag clothing labels and dishwasher safe slim labels. The tag-a-tag labels are designed to stick right on clothing tags and not wash off in the laundry. 

The shoe labels are my favorite! Can’t wait to get my order. 
To get 10 off your next order, enter code PROJ10 at checkout. Order soon though, the offer expires September 7, 2010.
Happy Organizing & Happy Friday!
Related Posts Plugin for WordPress, Blogger...
Read full story By on August 27, 2010 in baby and children, friday find, organization tips

Getting Organized for Back-to-School

It’s that time again. Millions of children are headed back-to-school. There is a direct relationship between how organized a child is and how well they do in school. As a parent or guardian, you can help children develop life-long organization skills. Here are a few back-to-school tips for getting organized:
Establish a Routine & Plan Ahead. Streamlining the morning routine is essential to get kids out the door and to school on time. It’s easy to get frazzled in the morning, so prepare lunches, book bags, outfits, even the breakfast table the night before. Create a storage area near your most used door and assign each person a bin and/or hook for their gear. Using color coded baskets or personalized tins {like the one above from the MacBeth Collection} helps for organization and quick identification when leaving the house.
Create a Homework Station. Few children enjoy doing homework, but making creating an efficient work environment may make the task more fun. First determine where it’s best to set up the homework station – Near the kitchen where an adult can help? In a quiet room alone? Is a computer needed? Once a location is selected, it is important to have an easy accessible storage bin or drawer with needed school supplies. Based on your child’s age and school needs store items such as writing implements, paper, tape/glue, scissors, ruler, erasers, crayons and markers. When purchasing school supplies, consider earth-friendly and non-toxic items. Visit EWG’s back-to-school guide for a list of greener options. Pottery Barn Kids has a great Mini Lazy Susan perfect for a storing supplies at the homework station {shown above}.
Paper Source also shows you how to make a customized desk cubbie here {also pictured above}. Get your child excited about their homework station by having them help designing their own supply storage cubbie.
Centralize School Communications. Besides your child’s school papers, there will be lots of communication parents will need to take action on or reference throughout the school year. Some of these items include classroom rosters, school handbook, supply list, permission slips and school calendar. Creating a centralized place for all this information is key to knowing where these important papers are when you need them. A binder or file folder are great options for keeping all the papers organized into subcategories. Smead offers an easy to use tiered folder – Smead Stadium File™ – that works great in my home {blogged about it here}.
Getting organized for back-to-school takes some effort, but it will make the transition smoother.
Happy organizing!
Related Posts Plugin for WordPress, Blogger...
Read full story By on August 16, 2010 in baby and children, back-to-school, green design, home organization, organization tips

My Wedding and ScanCafe

Over nine years ago my hubby and I got married in beautiful Lake Tahoe, Nevada. which also happens to be where I grew up. It was one of the best days of my life and our only regret is that we didn’t invite more friends to attend. Back then digital photography was not as common and our wedding was shot in traditional film {by Scott Wall Photography}. Even though I have all my photgraphs safely preserved in an acid-free photo album, I wanted to have them also stored electronically.
I turned to ScanCafe, based just down the street in Burlingame, CA to scan my entire wedding  album and I was delighted with the outcome. I am sharing a handful with you today.


As a professional organizer, I encourage clients to preserve their precious images by scanning them because color photos, slides and negatives will fade in the presence of light and decompose even in the absence of light. Scanning those old photos will also reduce the cluttered stacks taking up space in your closets and attics.
If you don’t have time to scan them yourself, ScanCafe would be a great option. Just send them the images in a box and in weeks, you’ll have an online gallery where you can pick the ones you want (you’ll be charged only for keepers), which you’ll then receive on DVD.
I was so pleased with the outcome, ScanCafe became an Affiliate Sponsor of Simplified Bee – see below or in the far right sidebar for their link.

Related Posts Plugin for WordPress, Blogger...
Read full story By on August 11, 2010 in Entertaining, organization tips

Guest Blogger: Joshua Zerkel With 5 Tips for Easy Cable Management

Today, I am thrilled to have Joshua Zerkel of Custom Living Solutions guest blogging. Based here in San Francisco, Zerkel is a professional organizer and productivity expert. He has cracked the code on cable management {a problem most of us have in our home and offices!} and am excited to have him share some of his techniques with us.

This is Joshua Zerkel from Custom Living Solutions. In addition to the work I do with clients helping them get more organized and boost their productivity by managing their paper, space, and time, I specialize in helping clients integrate technology into their work and into their lives. I’m pretty geeky, so sharing how to best use technology is really fun for me. Part of working with technology means finding ways to deal with the array of cables that seem to multiply with each new device we get. I’ve spent many hours under desks and behind cabinets trying to make it seem like the cables are barely there. Here’s how I do it:
Reduce – The vast majority of clients that I work with have way, way more cables than they need. There’s a sort of “cable entropy” that happens for most of us. We get a computer and some peripherals, the cables go behind the desk, and when we get new devices or gizmos to replace our old ones, many of us leave the old cables behind or just let them drop behind the desk. This can lead to a giant cable tangle. Sorting out this tangle, and determining exactly which cables are needed, is the first step in cable management. Make sure you have all of your devices hooked up properly, and then responsibly dispose of the unneeded cables at your local e-waste recycler.
Go wireless – Lots of devices, from computers to speakers, can now live with fewer wires thanks to technology like Bluetooth and Wi-Fi. Fewer wires equals less clutter! If your computer or peripherals can work wirelessly, you may be able to significantly reduce the amount of cables you have to manage. If you’re replacing an older device, it’s worth it to spend the extra money to get one that has a wireless option. And if you can’t go wireless, consider purchasing shorter cables to reduce the slack you’ll have to manage.
Label – For any cables or wires that you are keeping, it’s definitely worth it to pull out your labelmaker and clearly label your cables. Instead of trying to figure out the mystery of a group of all-black, similarly shaped cables, clearly labeling makes it so much easier when you need to unplug and then re-plug your gizmos. I recommend labeling your cables at BOTH ends with the name of the device that the cable is connected to. 
Group – Once you’ve reduced your cables to the ones you actually need and use, then it’s time to start gathering them together. I prefer to create two groups – the power cables, and then the other cables (audio, video, USB, etc.). Once the cables are grouped, then it’s time to get some cable ties and wrap the cords so they don’t become separated. Make sure to leave enough slack so that you can still access your various components easily.
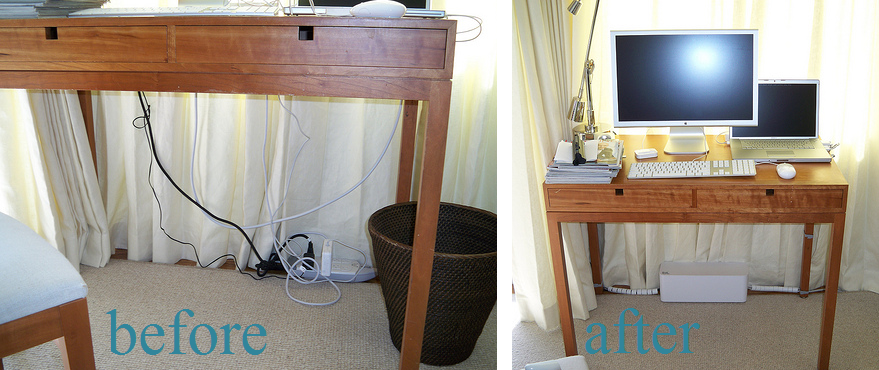
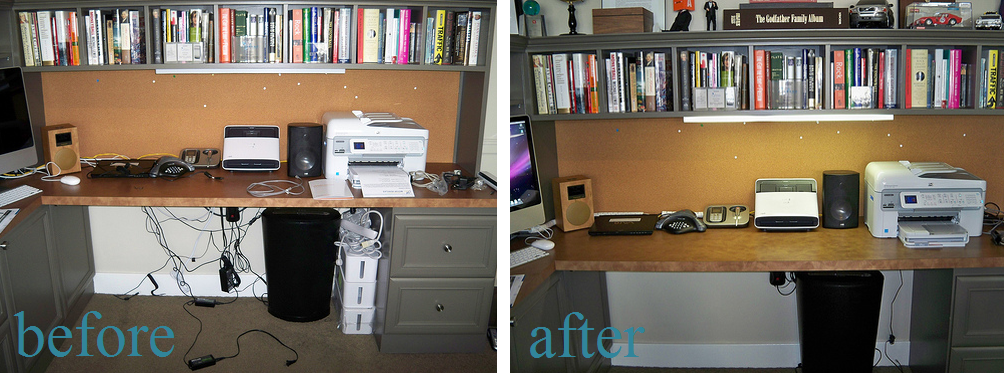
Hide – The final step in cable management is to hide the cables as much as you can. There are plenty of tools can help with this, from cable sheaths which you can put groups of cables into, to cable boxes which help to hide power adapters, extra cable slack, and power strips. A technique I like to use as much as I can is to route cables down the rear legs of a desk or table, and to tie them in place where they won’t be noticed. This is how I’ve made cables “disappear” for many of my clients. 

Cable management is definitely an art, and it takes some careful planning and ingenuity to make sure that you manage and hide the cables as much as you can.
Related Posts Plugin for WordPress, Blogger...
Read full story By on June 28, 2010 in home organization, organization tips