Archive | Holiday RSS feed for this section

Tips on How to Wrap a Gift

Sometimes what makes a present so special is the way it’s wrapped. Knowing how to wrap a gift is a good skill to have. Here’s a simple tutorial on wrapping a rectangular box, but this could be easily applied to other shape packages as well.
gift wrap how to // simplified bee

Supplies you’ll need:

how to wrap a gift
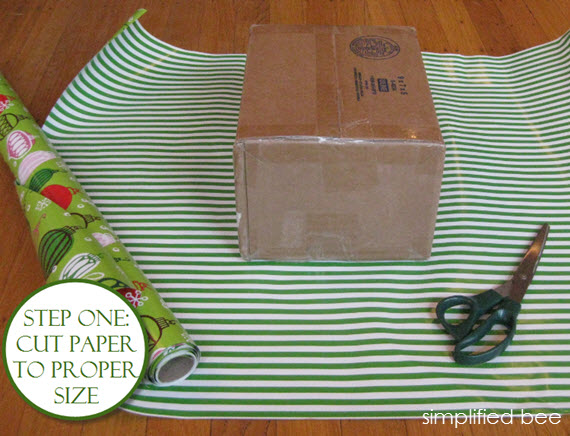
The secret to a neat package is to not use excess paper. Determine how much gift wrap you’ll need by placing the box along the length of the paper. Then unroll enough so that it wraps around the box with a 2” overlap. Also make sure that there is adequate wrapping paper at the ends to cover them completely when folded down. Use a pencil to mark where the overlaps end. If cutting in a straight line is a challenge or your paper doesn’t have a guide, use a rule to help you keep your cutting in line.
wrapping paper how to // simplified bee

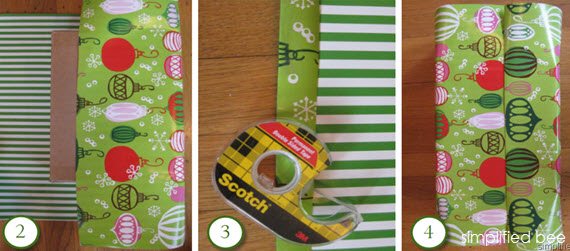
2. Draw paper around smoothly and tape with double stick tape.

3. If you do have excess paper, fold over to created the right fit.

4. Use double stick tape to secure the second side in place.

gift wrap // corner how to

5. Fold down the top part of the wrapping paper and tape in place.

6. Crease the sides and fold inward. Fold the bottom flap into a triangle {fold tip if desired}. Tape in place.

7. Tape the bottom flap to the box. Repeat steps 5 – 7 for the other side.

using excess wrapping paper as ribbon
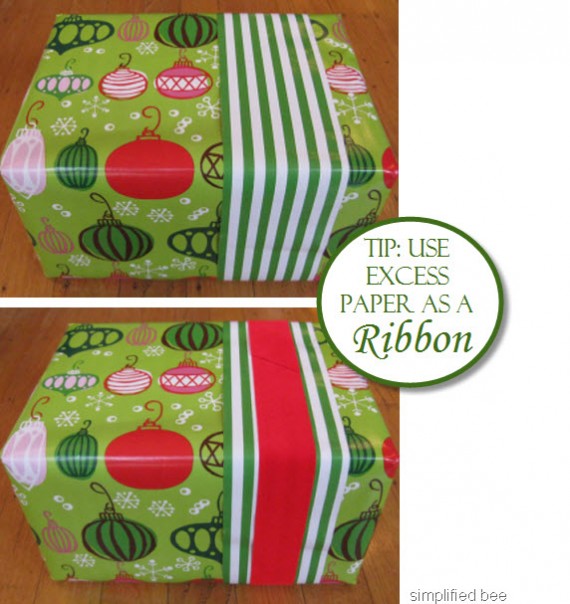
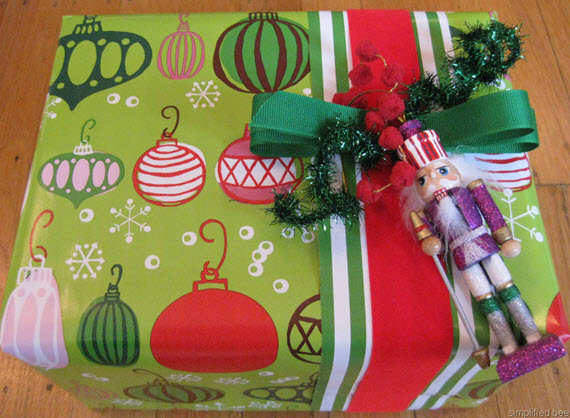
To finish off the look, add a ribbon or two. I like to layer ribbons that compliment the wrapping paper. Here I wrapped the package with a green & white striped gift wrap leftover and secured it with tape. Then I wrapped a smaller width vintage red velvet ribbon and taped it in place.
gift wrap how to complete

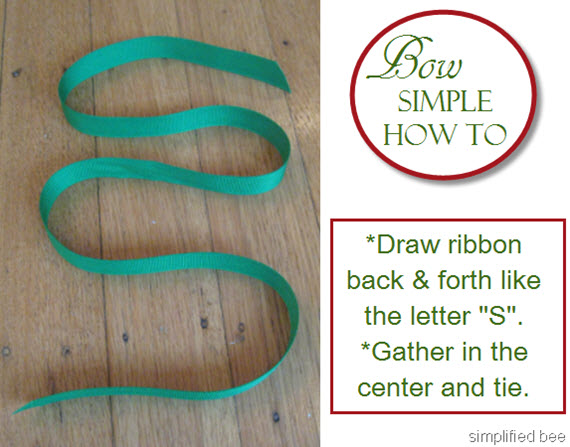
The bow on top was created using recycled ribbons.

how to tie a simple bow #giftwrap
how to wrap a gift #tutorial

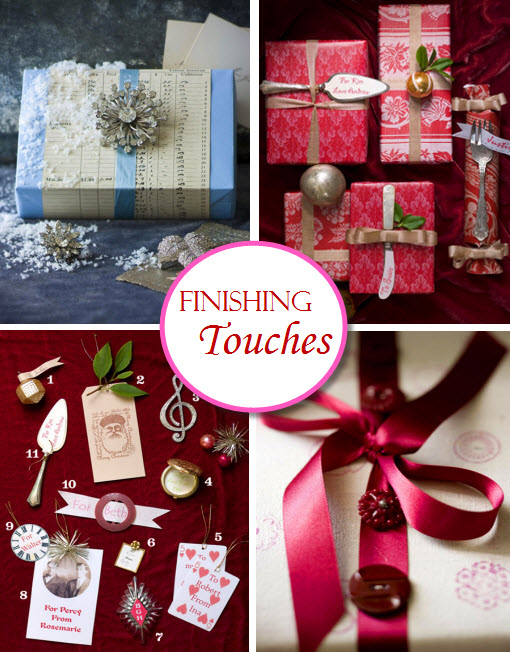
Add a card, gift tag or small ornament to personalize the gift.

gift wrap finishing touches
Vintage brooches, antique silverware, colorful buttons and other flea-market finds also make perfect finishing touches to a gift. {all images above via  Country Home 2008}
fabric reusable gift wrap how to
Furoshiki, a Japanese gift wrapping technique, uses a large piece of fabric for wrapping gifts. This is good for the environment because there is no paper waste. It’s also chic and economical because it can be used again. Visit Joybucket for a tutorial on making fabric reusable gift wrap {image above via Joybucket}.
gift ribbon straighting technique easy

Recycling ribbon is also a good thing, but what if it’s wrinkled? Real Simple shows us a great technique to get the kinks out using a flat iron.

Are your gift wrap supplies out of control? For gift wrap storage solutions go here.

Happy Holidays!
* all photo by Cristin Priest for Simplified Bee or otherwise stated.
Related Posts Plugin for WordPress, Blogger...
Read full story By on December 8, 2010 in Birthdays, Christmas, DIY, holiday decor

Christmas Rose Floral Arrangement How To

Decorating with fresh flowers is always a nice touch, but professional floral arrangements can be expensive. If your wallet is being squeezed this holiday season, here’s a simple and elegant floral arrangement you can do yourself.

What you’ll need:

  • Round decorative bowl or vase
  • Oasis / Foam Brick {floral supply}
  • 2 dozen large roses {amount may vary depending of the size bowl used and rose heads – I picked mine up inexpensively at Trader Joes}
  • Pair of Pruners or Snips
  • One bunch greenery {leaves, lacey fern, or decorative grasses}
  • Large mixing or sink
how to arrange red roses tight grouping
1. Cut a piece of foam to so that if fits in your decorative bowl or vase.
2. Fill mixing bowl or sink with cold water. Then drop the foam brink into the water, but do not push it down. Let is soak up the water and sink to the bottom on its own. This will ensure that it is saturated. Let the foam soak for 15 minutes.
3. Place the saturated foam brick into the decorative bowl or vase.
4. Using a pruner or snips, cut one rose so that it’s stem is approximately 3” {this also may depend on the contain your select}.
how to arrange flowers roses

5. Push cut flowers one by one into the oasis starting in the center and then four corners.

6. Fill in the empty spaces with more roses while trying to keep a rounded look {you may need to shorten some of the stems to make it curve}.

how to arrange roses step by step
7. At the base between the roses and the bowl or vase, place sprigs of greenery. Cascading Heather, grasses, lacey fern, or tree leaves {pine, lemon, etc.} would work. The greenery will go all the way around.
christmas red rose floral arrangement how to
That’s it! Create a floral arrangement for your holiday mantel, table centerpiece or to welcome guests on an entry table. Either way fresh flowers will add just the right to your holiday décor.

For more Christmas crafts, visit Kate’s Centsational Girl

Happy Holidays!
* all photos by Cristin Priest for Simplified Bee
Related Posts Plugin for WordPress, Blogger...
Read full story By on December 7, 2010 in Christmas, DIY, Entertaining, flowers, holiday decor

How to Decorate a Christmas Tree with a Designer Touch

designer christmas tree white ornaments
{image from BHG}
The Christmas tree is typically the focal point in the room during the holiday season. Decorating the tree isn’t difficult, but approaching the process in layers makes it more manageable and the end result beautiful. Here are some tricks and tips for a designer holiday look.
designer christmas tree how to white
Determine the Look & Feel
Before getting to work, think about the color scheme and feeling you’d like your tree to convey. Keeping the color palette to three main colors is an easy way to begin {but not necessary}. For example, Martha Stewart’s holiday tree above is comprised of different shades of yellows/gold, silver/blue and white/creams. Taking a color from your palette and turning up or down the shade is a great way to add visual interest.
Once you have a color scheme in mind, take inventory and group your existing ornaments, garland and other tree accessories according to hue to see what you may already have. Determine where you might need more color. Need more red? Drop by Goodwill, Target or Kmart to see what’s on sale. If you are crafty and have the time, try making an ornament or garland that fits design your vision.
seashell theme christmas tree martha stewart
If you don’t think in color, then you may want to design your tree from a theme. This coastal tree with colorful shells, starfish and sailboats was created by Martha Stewart.
colorful flocked pink christmas tree tobi fairly
Or how about this adorable “monkey” Christmas tree Tobi Fairley designed for her daughter’s playroom? The bright multi-colored ornaments and whimsical sock monkeys make this tree one of my favorites this holiday season.
designer christmas tree how to lights
{image via Martha Stewart}
Add Light
A well illuminated tree is the first step. Small white lights are typically more sophisticated than multi-colored or larger lights, but of course this is up to you. String lights from top to bottom and tuck the light strands carefully around the branches  to illuminate the tree’s interior. Wrap the lights around every major branch and string from the trunk down to the branch tip and them back. A seven-foot tree will need approximately 700 lights or 100 lights for every foot. Check stores for new, energy-saving LED options.
christmas tree garland ideas
Drape with Garland
Beads, ribbon or tinsel. There are so many fun garland options for draping around the tree. Strung popcorn, berries, gum drops or pinecones can be made easily and inexpensively at home {just a little time intensive}.  When placing garland, it is best to start at the top and work your way down and around the tree. Some garland such as beads may look best with a little swag between branches.
green silver white christmas tree
Mix garlands of different size, texture and shape for a more designer look. This “How to Make Garland” post from In My Own Style also has great ideas for making and draping garland.
designer christmas tree how to
{image via Country Living}
Hang the Ornaments
Hanging the ornaments is the fun part and something the whole family can help with. If you have favorite or meaningful ornaments you want to stand out, place them at eye-level. Hang larger ornaments first by spacing apart. Place middle sized ornaments in between and follow-up with the smallest ornaments. Reflective hand-blown glass ornaments, silver or gold balls and crystals look best when near a light.
christmas tree skirt red greendesigner scalloped tree skirt how to
Skirt the tree base with a skirt {examples up top from Pottery Barn and Ballard Design}, create your own {scalloped felt tree skirt how to from Martha Stewart} or simply gather a white sheet around the base. 
christmas tree star topper designer
Oh, and don’t forget to top the tree in style! This blue, and gold Christmas tree from Country Living is darling with the star topper and repeated pattern in the garland.
Happy decorating and happy holidays!
Related Posts Plugin for WordPress, Blogger...
Read full story By on December 3, 2010 in Christmas, Holiday, holiday decor

Our Elegant {and even glamorous} Christmas Mantel

elegant chic christmas mantel decor
Last year our holiday mantel was decorated asymmetrical with lots of color, vintage ornaments and traditional fir & pine garland. As you can see, this year’s Christmas mantel is symmetrical, monochromatic and frankly more elegant. The Lee Industry arm chairs in chartreuse flanking the fireplace inspired the mantel’s color palette of greens and whites with splashes of gold and silver.
  
chic mini trees christmas mantel design
A trio of etched mercury cachepots from Pottery Barn are filled with crisp white feathers and playful white winter berries. A small collection of vintage and contemporary Christmas trees are set just off center and each pick up different colors in the palette {actually used these cuties last year}.
white silver green christmas mantel decor simplified bee
For a more formal look, a pair of small live fir trees are placed on either side of the mantel. Each tree is set in beautiful birch wrapped tins – this earthy element balances the sparkling silvers and glass and adds a warming neutral color that compliment the winter berries. Matching blown glass mercury candlesticks {Pottery Barn} hold chunky white candles and are placed next to each tree. The entire mantel is lined with fresh Heather and Camilla tree branches – love the varying textures and shades of green.
white winter berries snowman christmas mantel
Perched on a small present, a silvery white snowman ornament adds a whimsical touch.
silver green christmas mantel decor
Simple, low-maintenance moss balls are placed on a silver “trophies” picked up at an estate sale. I was told they were originally used to place cigarettes. Really? They look much better in this form I think.
metallic glass ornament wreath diy silver gold
Hanging from the hammered tin mirror is a glass ornament wreath inspired by Eddie Ross’ in 2008. This was a fun DIY project and easy to do. The glass ornaments are a combination of ones found at an estate sale {vintage for $1} and Goodwill {$1 for two dozen – brand new}. Here is the how to by Eddie.
chic christmas horse decor and stockings
A proud white ceramic horse stands stately atop vintage Lucite nesting tables and favorite design books. It’s fun to take everyday home décor items like this and make them holiday ready by simply adding a little festive ribbon and tinsel. A chic Moroccan inspired print fabric is added to crushed avocado green velvet stockings. The pair are hang from a single panel fireplace  screen – love how the patterns in the screen and stocking play off one another. Swags of silver tinsel are added to the mantel for a touch of glam.
Need some more inspiration? Go here are fabulous ideas on how to decorate your mantel for the holidays.

Happy Decorating, Happy Holidays!


* all photos by Cristin Priest for Simplified Bee
Related Posts Plugin for WordPress, Blogger...
Read full story By on November 30, 2010 in Christmas, DIY, Holiday, holiday decor, home accessories, mantels, simplified bee portfolio