Tag Archives | Organizing Tips

How to Design an Organized & Stylish Kids’ Playroom

A dedicated playroom may not be necessary if you live in a moderate climate year-around.  But for those that have to endure long cold winters or heat wave summers,  designing a playroom where kids can “shake their sillies out” is a good idea – not only for them, but you! Here are some tips on  how to design  an organized and stylish playroom:

Design with Your Child in Mind.
This may seem obvious, but it is really important to determine what your child likes to do before anything else. Does he enjoy legos, trucks or books? Does she love to paint, sing or play dress-up? Then select items for the space such as an easel, train table or cozy reading chair that will promote their interests. 
This fun & funky playroom {above} designed by Little Crown Interiors includes a mini black and white laminate dance floor and working disco ball for the future Broadway star. The aqua wall mirror mimics the checkered pattern in the dance floor nicely.  Whimsical custom cabinets are beautifully built to store and organize all those toys.
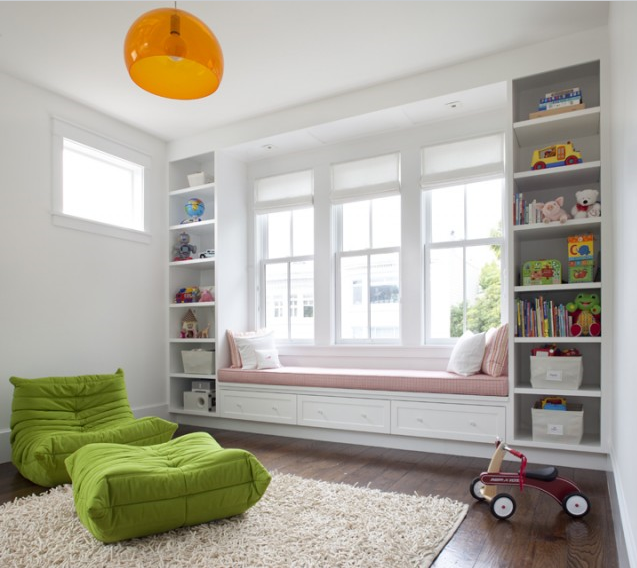
{image from Feldman Architecture via Houzz}
Go Vertical.
Floor to ceiling shelving helps maximize storage and helps balance a space visually. Check Ikea, Pottery Barn Kids and Room & Board for some great options. Organize the toys in stylish baskets & bins to keep clutter-free and easier to maintain. Favorite age appropriate toys should be kept within reach and on lower shelves to accommodate little ones.

San Francisco based, Feldman Architecture designed this practical, yet stylish playroom. The floor to ceiling built-in shelves and bench not only maximize storage, but frame the windows beautifully.

{image from Ore Studios via Design*Sponge}
Look Down.
Selecting the right flooring for your playroom is also important. If you have wooden, cement or carpet flooring, layering it with an easy to clean area rug is a good idea. The playroom above designed by Ore Studios showcases colorful carpet tiles from FLOR {child table & chairs from Room & Board}. I have recommended FLOR tiles to clients before and love them because they are washable, interchangeable and are available in a vast array of colors. No nails, glue or padding necessary. Gotta love that.
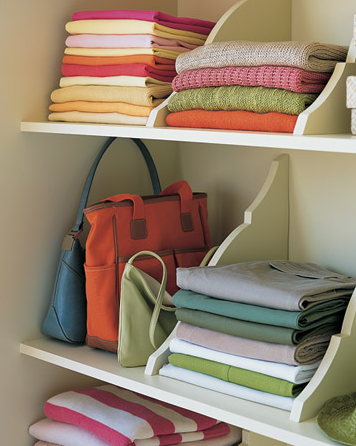
{image via Dash & Albert via Posh Tots}
I am also a hug fan of Dash & Albert woven cotton rugs. They offer tons of colorful patterns including preppy stripes in just about every hue and color combination. Although not used in a playroom, we have a  3′ x 5′ Dash & Albert rug in a high traffic area and cleans up beautifully in the washing machine. 
Select Petite Furnishings.
Purchasing the right “kid” size furniture for a playroom is important. Because kids grow up so fast, and pieces may not be used more than a few years, first hit local consignment stores,  flea markets and yard sales for used kid’s furniture. Ebay and Craigslist are also favorite resources for finding inexpensive furniture. Also, don’t be afraid to purchase pieces even if a little beat up. A fresh coat of paint in a color coordinating with the room may be all that is needed.
Retail stores such as Pottery Barn Kids, Land of Nod and Rosenberry Rooms are also great resources for child’s size furnishings.
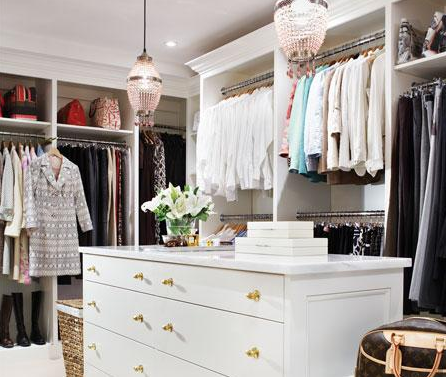
 {image via Houzz & Affordable Closet Systems}
Add Color.
A playroom by nature is supposed be fun. The colors you select will either energize or calm. Determine how you want the room to feel: Calming or cool colors are often hues blues, greens and violets {most grays included}. Energizing or warm colors are often hues of  red, orange and yellow {browns and tans included}.
In this playroom above by Affordable Closet Systems horizontal stripes are painted on a slanted wall/ceiling in a cooling blue and green hues. The wide stripe combined with the narrow striping above the custom bookcase creates visual interest and draws our eyes up.
{image from Allison Cosmos via Houzz}
Personalize the Space.
Decorating the walls with framed family photos, vacation spots or pieces of your child’s own artwork is a wonderful way to personalize the space in a playroom.  For those with a particular theme {i.e. jungle, princess, western, etc.} a custom mural or monogram wall decal are also great options.
Artist, Allison Cosmos recreated the Mad Hatter tea party from Alice in Wonderland in this closet turned playroom. So sweet.
Bottom line, designing a playroom should be fun, so enjoy the process! 
Do you have a playroom for your kids or one when you were growing up?
Related Posts Plugin for WordPress, Blogger...
Read full story By on September 27, 2010 in baby and children, Design Tips, interior design, Playroom

Step-by-Step: Preparing Your Home & Family for an Earthquake or Disaster

With September being National Emergency Preparedness Month, I attended a sobering presentation on Earthquake Preparedness by a professional from the USGS. We were told that there is a 62 percent probability for one or more magnitude 6.7 or greater earthquake will strike the San Francisco Bay Area region from now to 2032. (yikes!) It is also reported that only half of people have readiness items set aside in their homes for use in disasters.
But, of course it is not just the people in earthquake country that should be getting their home and family ready in case of an emergency. As we have seen from recent disasters around the world, being unprepared can be devastating. Many put off creating an emergency plan because it seems like such a time intensive and expensive project. The emergency plan checklist by Buttoned Up breaks it down into smaller tasks that can be accomplished in 20-30 minutes increments (download free here). Using the emergency plan checklist as a guide, below are helpful tips and links to preparing for a catastrophe:

One: Organize Your Emergency Plan

Your family may not be together when a disaster occurs, therefore it’s essential to plan in advance how you will communicate and get back together in different scenarios. 
  • Establish a contact. Because it may be easier to make an out-of-town call, identify a contact {ideally out-of-state} your family can call and who can also relay information.
  • Make a contact list. Provide a list of contact phone numbers to all members of your family. For cell phone users, program that person(s) as “ICE” (In Case of Emergency) in your phone. If you are in an accident, emergency personnel will often check your ICE listings in order to get a hold of someone you know. Also, make sure to let your family and friends know that you’ve listed them as emergency contacts. 
  • Subscribe to alert services. Many communities have systems that will send instant text alerts or emails to let you know about such things as bad weather, road closings and local emergencies. To sign up, visit your local Office of Emergency Management website.
  • Establish a meeting place. Select two meeting places in the case your family is separated in an emergency. The first location should be near your home. The second should be out-of-state or further away. Also, review possible evacuation routes available in your area online.
  • Learn about school and work plans. Find out what emergency plans are in place for your work and child’s school.
  • Share the plan. Distribute basic emergency information with your family, friends and neighbors. It should include your contact information, emergency contact, out-of-town contact and your neighborhood meeting place.
  • Prepare Your Home. Identify items in your home that need to be secured in the case of an earthquake. For complete information on making your home safer visit FEMA.

Two: Document Your Valuables

To be reimbursed after a catastrophe need a list of the items in your home. Recording with a video or camera the items you would want replaced is a great option. Also, documenting room to room all valuables {artwork, electronics, jewelry, rugs, furniture, clothing, etc.}.  To make the task a little easier, Buttoned Up has created a binder, Valuables.doc that breaks down the big job of making an inventory into eight smaller steps.
The next step is to store the video, photos or list safely with your attorney, accountant or family member.


Three: Get Your Records Ready

One way to organize for an emergency is to create a binder. The binder holds the most critical information for your home and family, so you’re never without it when you really need it. It should be kept in a safe, yet handy place. Assuming you have a computer and printer, creating the binder is a fairly easy DIY project – here’s how step-by-step

Four: Prepare Your Emergency Kit

Ready America, recommends the following items be included in a Basic Emergency Supply Kit:
  • Water, one gallon of water per person per day for at least three days, for drinking and sanitation
  • Food, at least a three-day supply of non-perishable food {canned & packaged foods – include cooking utensils}
  • Battery-powered or hand crank radio and a NOAA Weather Radio with tone alert and extra batteries for both – this one includes a flashlight!
  • Flashlight and extra batteries
  • First aid kit
  • Whistle to signal for help
  • Dust mask, to help filter contaminated air and plastic sheeting and duct tape to shelter-in-place
  • Moist towelettes, garbage bags and plastic ties for personal sanitation
  • Wrench or pliers to turn off utilities
  • Manual can opener for food (if kit contains canned food)
  • Local maps
  • Cell phone with chargers, inverter or solar charger
This is a list of additional items to strongly consider adding to an Emergency Supply Kit:
  • Prescription medications and glasses.
  • Infant formula and diapers.
  • Pet food and extra water for your pet.
  • Important family documents such as copies of insurance policies, identification and bank account records in a waterproof, portable container.
  • Cash or traveler’s checks and change.
  • Important family documents such as copies of insurance policies, identification and bank account records in a waterproof, portable container. You can use the EFFAK Emergency Financial First Aid Kit – PDF, 277Kb) developed by Operation Hope, FEMA and Citizen Corps to help you organize your information.
  • Emergency reference material such as a first aid book or information from www.ready.gov
  • Sleeping bag or warm blanket for each person. Consider additional bedding if you live in a cold-weather climate.
  • Complete change of clothing including a long sleeved shirt, long pants and sturdy shoes. Consider additional clothing if you live in a cold-weather climate.
  • Household chlorine bleach and medicine dropper – When diluted nine parts water to one part bleach, bleach can be used as a disinfectant. Or in an emergency, you can use it to treat water by using 16 drops of regular household liquid bleach per gallon of water. Do not use scented, color safe or bleaches with added cleaners.
  • Fire Extinguisher {get training from your local fire department on how to properly use a fire extinguisher}.
  • Matches in a waterproof container.
  • Feminine supplies and personal hygiene items.
  • Mess kits, paper cups, plates and plastic utensils, paper towels.
  • Paper and pencil.
  • Comfort items such as books, games, puzzles or other activities for children.
For those in earthquake country, have each member of the family keep sturdy shoes, whistle and a working flashlight next to each bed. The shoes will protect feet in the case of broken glass. Also teach everyone in your household to use  the whistle or knock three times repeatedly if trapped.

Also, find out how to keep food safe during and after and emergency by visiting here.

Five: Discuss Your Plan With Your Family

Set a time to meet with all members of your immediate family and those that live with you to discuss your emergency plan together. Let all know where to find the emergency kit(s), locate important information and who has the documentation for household valuables.
 
Is your family ready for a catastrophe? If not don’t delay in preparing. Planning for a disaster sounds depressing, but when complete will reduce any anxiety or worry you may be feeling.
Plan ahead and be safe!
Related Posts Plugin for WordPress, Blogger...
Read full story By on September 14, 2010 in disaster preparedness, emergency preparedness, home organization, Organization, organization tips, Organizational tips, Tips/Tricks

Spring Cleaning Tips: Making Your Closet Functional & Beautiful

Keeping a house clean is a year around task, however many bigger cleaning projects are saved for when the seasons change. Washing windows, cleaning upholstered furnishings and washing outdoor furniture many be some chores on your spring cleaning checklist. Getting your closet organized is also an important task as we go into spring and here are a few tips to help you get started:

Store. As you transition your wardrobe closet from cold-weather clothing to warm-weather clothing, make sure that you store sweaters, coats and pants away in zipped bags that protect your garments from moths and other pests. And before you store, make sure your garment is cleaned. The Container Store has some great storage options and a spring organization sale going on now.

Give. Donate clothing that you do not wear to a local charity. Don’t know one in your area? Excess Access will match you with a charity organization in your zip code. They link each donation with the wish-lists of your nearby charities that can provide pick-ups or will accept drop-offs. And donors get tax-deductible receipts.

Organize. If you have a large or walk-in closet it’s best to organize it into zones by season or garment type (i.e. work, casual, formal). Next arrange the clothing into sections for each category (i.e. blouses, dresses, pants, etc.). Then arrange the clothes in each section by color from left to right (i.e. black, blue, brown, red, orange, yellow, ivory and white). This makes it much easier to find outfits and is more pleasing to the eye. Wouldn’t you agree?

Function & Style. To help keep shirts, shoes and sweaters arranged neatly I recommend stackable boxes with clear fronts like these tweed drop-front boxes. The clear drop-front allows you see what’s inside and to access items without having to unstack them.

Plan. The Today Show recently highlighted Closet Lite, a high-tech clothing organization/planning application for your iPhone. It allows you to organize your clothing, create outfits, plan them for certain days and view them. This app can even create packing lists for any upcoming trips. Love this!

Speaking of trips – are you taking a vacation for spring break? If so, here are some more tips on packing for a trip.

Happy spring and happy organizing!

*images courtesy of House Beautiful, Martha Stewart, Canadian House & Home, Making it Lovely

Related Posts Plugin for WordPress, Blogger...
Read full story By on March 31, 2010 in Closets, home organization, household cleaning, Organization, organization tips, storage, travel tips

Holiday Organizing Ideas: Storing Ornaments Safely

Holiday clean-up is a chore many of us dread and can’t ignore. Packing and storing Christmas tree ornaments is a project that takes some planning and time. There are several storage options to help you pack away ornaments neatly and safely until next year.

Up for doing-it-yourself? Martha Stewart uses corrugated cardboard, paper cups and egg cartons to covert a standard plastic storage bin into a container perfect for housing our most fragile ornaments.

Who said storage can’t be stylish? The beautifully patterned jacquard fabric of the Jubilee Ornament Storage Chests makes them easy to spot when it comes time to trim the tree.

This space-saving holiday storage box consists of three stackable trays with adjustable dividers to accommodate as many as 48 ornaments. I like that the clear body of this Christmas storage box allows you view the contents easily.

These Archival Ornament Storage Boxes provide secure storage and protect your holiday treasures from damage due to ultraviolet light and migrant acid.

Now that you have organized your Christmas ornaments, are you still buried in ribbons and gift wrap? If you need ideas on storing holiday gift wrap, go here. For more DIY ideas, go here.

Happy holidays, happy organizing!

Related Posts Plugin for WordPress, Blogger...
Read full story By on December 30, 2009 in Christmas, holiday decor, organization tips